Showing posts with label Cloudfone Excite Prime. Show all posts

Thursday, June 16, 2016

[ROM][PORT] X-ROM Ported to Cloudfone Excite Prime

[ROM] XUI ROM for Cloudfone Excite Prime


XUI ROM PORTED TO CLOUDFONE EXCITE PRIME

XUI ROM PORTED TO CLOUDFONE EXCITE PRIME

Disclaimer: Tweaking your phone, rooting, modifying will void your warranty so think first before doing so. Also, I am not responsible of any damage occur on your phone while flashing this ROM. (wink) ;)
Features:
Explore nyo nalang katamad mag explain haha. READ HOW TO FLASH :)
How to Flash:
  1. Download ROM
  2. Save to SDCard
  3. Reboot to Recovery (TWRP 3 is highly recommended)
  4. Factory Reset
  5. Go to Mount, Un-check system
  6. Install ROM
  7. Wait
  8. If success, Wipe Cache/Dalvik
  9. Reboot
  10. Wait and DONE! Congrats

ROM LINK -> (CLICK ME)

Fix Playstore Log In Issue

Bugs found major and minor
  • No Flashlight app (dl one in PS)
  • No off-screen gesture

Credits:
  • Infinix for the XUI ROM itself
  • Maximum Porting Team
  • CEP DEVS
  • Gio Olorvida

Friday, April 22, 2016

[ROM] Cloudfone Excite Prime Stock Odex


cloudfone stockrom


Note:
  • Backup first your DATA and System before flashing this rom
  • I'm not responsible on your device if you did not follow the instructions below
Changelog:
  • Remove additional apps
  • Remove Kitkat app icons
Instructions:
For TWRP:
  1. Download this Rom and put it on your SD Card
  2. Go to TWRP recovery > Wipe > Factory Reset
  3. Go back to recovery and Tap Install
  4. Find the rom and install it
  5. Wait until its finish
  6. If it is finish then Tap Wipe Cache/Dalvik
  7. Install the SuperSU-V2.70.zip below(Optional if you want to root it)
  8. Reboot
  9. Wait until it opens
  10. Done
For CWM and CTR:
  1. Download the Rom and put it on your SD Card
  2. Go to CWM/CTR recovery Wipe Data, Cache, and Dalvik Cache
  3. Tap install update from sdcard
  4. Find the rom and install it
  5. Wait until its finish
  6. Install the SuperSU-V2.70.zip below(Optional if you want to root it)
  7. Reboot
  8. Wait until it opens
  9. Done
Links:
Credits:
  • Josiah Tingzon (For stock rom)
  • Rotciv Yodnas (For boot.img)
  • Eljay Dulin (For META-INF)
  • Maximum Dev/Port Team
  • CEP Tech Support Porting Team
  • Cherry Mobile Amber 2 UNITED
  • Cloudfone Excite Prime Tech-Support™ Group

Saturday, April 16, 2016

[ROM] XUI ROM for Cloudfone Excite Prime

[ROM] XUI ROM for Cloudfone Excite Prime
XUI ROM FOR CLOUDFONE

How to Flash:
  1. Download ROM
  2. Save to SDCard
  3. Reboot to Recovery (TWRP 3 is highly recommended)
  4. Factory Reset
  5. Go to Mount, Un-check system
  6. Install ROM
  7. Wait
  8. If success, Wipe Cache/Dalvik
  9. Reboot
  10. Wait and DONE! Congrats

ROM LINK -> (CLICK ME)


Bugs found major and minor
  • No Flashlight app (dl one in PS)
  • No off-screen gesture

Credits:

  • Infinix for the XUI ROM itself
  • Maximum Porting Team
  • CEP DEVS
  • Gio Olorvida

Monday, March 28, 2016

How to fix bootloop and unbrick your Cloudfone Excite Prime

How to fix bootloop and unbrick your Cloudfone Excite Prime
Cloudfone Excite Prime Bootloop and Stockrom


Specs:
Display: 5.5 Inch HD IPS 1280 x 720 resolution at 267 ppi
CPU: 1.4 GHz MT6592M octa core processor
GPU: Mali 450MP
RAM: 2 GB
ROM: 16 GB expandable via micro SD card slot up to 32 GB
Rear Camera: 13 MP Autofocus w/ LED flash
Selfie Camera: 5 MP
Battery: 2,820 mAh
OS: Android 5.1 Lollipop
Connectivity: WiFi, 3G, Bluetooth, GPS, dual SIM, USB OTG
Ohers: Free Spotify Edition Earphones, Screen Protector, Clear Jelly Case
Price: 3,999 Pesos

Since we don't have available stockrom as for the moment. I just want you to teach on how to fix bootloop, softbrick, deadboot or unbrick your CEP. This stockrom came from Micromax e353 which the OEM of CEP. Once you have completed all the requirements then you must proceed and follow the step by step procedure carefully.

Requirements:
SP_Flash_Tool_v5.1352.01.rar
or
SP_Flash_Tool_v5.1424.00.rar

FOR WINDOWS XP/7 -INSTALLING DRIVERS
1. Download Mediatek Driver and Extract then Install the driver for 32 or 64 bit operating system of windows 7.
Driver Choose 32 or 64 bit
2.  Before you plug your phone in PC, you need to focus in Device Manager, then plug your phone without the battery you only have approximately 5 seconds to appear MT65xx device that shows under Other devices, you need to right click it as soon as you see it.
MTK USB PORT

Then after you rightclick, click to Update driver software

3. Then choose - Browse my computer for driver software
Browse Driver

Browse the Mediatek MT65xx Preloader Driver folder

Make sure you know the version of OS to choose the right driver for your PC.

Choose your OS version, then choose if 32-bit or 64-bit for your PC.

E.G. s Win7  folder:
usb2ser_Win7.inf - if 32-bit
usb2ser_Win764.inf - if 64-bit

4. Another options, to find right driver for your phone is to open your internet while your phone is connected without the battery and automatically searching driver for your phone.

FOR WINDOWS 8/8.1/10 -INSTALLING DRIVERS
1. Download all necessary files and Enable USB Debugging mode in your phone..
2. Install Drivers USB_VCOM_Driver.rar
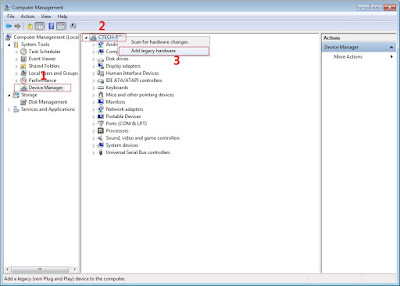
In Device Manager Right click on PC name(Right Side) and then click on Add legacy hardware as shown in image below.

add legacy
Now in Add Hardware Wizard click on Next » Install the Hardware that i manually select from a list (Advanced) » Show All Devices » Next » Have a Disk, Now select the any inf file from where you extracted the downloaded VCOM driver package.

mediatek preloader

3.  Now Click on Next and select Install this driver software anyway and wait for finishing the process.

Install driver anyway

4.  After installation is finished then Restart your computer, That's it.
If still not success in installing driver just Disabled Driver Signature Verification
1. Go to PC Settings>General>Troubleshoot>Advanced Options>Startup Settings>Disabled Driver Signature Enforcement>Then Restart
disabled driver signature verification
Once you disabled. Then follow the procedure above to install the driver. Once success proceed to next step.

II-FLASHING VIA SPFT
1. Open flash_tool.exe, click on the Download Tab
 Extract the downloaded AFP2 stock rom to the new folder you created.
Click flash tool

2. Click Scatter-loading and browse for the scatter file (MT6592_Android_scatter)
3. For Bootloop only
 Make sure flashing mode is set to "Download Only" and check mark all except Preloader.
Note: If deadboot/hardbrick set "Download+Format" and check Preloader.
4. Click Download.
mt6592-scatter-file-spft

5. Turn off your phone, connect your phone to the PC and wait for the flashing to commence.
6. Green Circle image with check will show once flashing is completed. That's it!

SPFT SUCCESS

7. Disconnect your phone in USB cord then open if still bootloop then try to factory reset in recovery settings. To go in recovery mode reboot your phone hold and press power on and volume up simultaneously until recovery mode appeared.


Credits:
CloudFone Excite Prime PH [Support]
John Paul Garmay
Micromax Device


Sunday, February 7, 2016

How to root Cloudfone Excite Prime and install Custom Recovery

How to root Cloudfone Excite Prime and install Custom Recovery

Cloudfone Excite Prime Root

Requirements:


Cloudfone Excite Prime


This tutorial teach you on how to root Excite Prime using updated Kingroot which can root even Android 5.1 or Lollipop version.

1. Download and Install KINGROOT4.8.0.APK
2. Open Kingroot and click Optimize Now
kingroot

3. Wait to finish and click continue.
4. You can uninstall now other apps like Purify.
5. Download Rootchecker in Playstore to verify.


Installing Custom Recovery
Requirements:
Rashr tools
TWRP 2.6(rename to recovery.img)
CTR (rename to recovery.img)
TWRP 3(rename to recovery.img)

1. Download Rashr Tool
2. Boot into Recovery
3. Locate recovery.img then flash!
Enjoy!


Credits:
Kingroot