Showing posts with label Stockrom. Show all posts

Sunday, June 5, 2016

How to fix bootloop CherryMobile Flare Play S

CherryMobile Flare S Play Stock Rom V05 & V06

Cherry Mobile Flare S Play Stockrom

This tutorial teach you on how to fix bootloop for Flare S Play but you need TWRP
recovery to flash this Stockrom V05 & V06.

Requirements:
-Rooted Phone
-With TWRP installed

Procedure:
-Extract the file
-Put the file in the folder of your SD card or Internal Sd
-Inside the TWRP folder create a folder Backup or Backup you Rom In Recovery and abort to create a destination folder
-Reboot into recovery (TWRP) select restore backup from internal or sd card.wait for the process to complete.
What’s in the Rom:
Root Ready (KingRoot)
Restore Using Custom Recovery via Restore
[UPDATED!!!]
Version 6 Rom
Download here: Click Here
Decryption Key: !wkQWKrZo58Y8ZB-BHn1RZ6pN2jJetdCdL5PLM4WusaY

After restore you might experience “unknown baseband” e.g. Invalid Imei
Try to do this method:
1. Rooted your MTK Android phone
2. Download and install Mobile Uncle Tools from Google play store.
3. Go to Engineer Mode and Select Engineer mode (MTK)
4. Go to Connectivity Tab and Select CDS information
5. Select Radio Information after that Select Phone1 (for the first IMEI)
6. At the top there is a command line which begins “AT+” just type there “AT +EGMR=1,7,”IMEI_1? (Put your first IMEI number number)
7. Hit send command and you will / may get a confirmation that "sent to mSend".
8. Now go back and select “Phone2? (for the second IMEI number)
9. At the top there is a command line which begins “AT+” just type there “AT +EGMR=1,10,”IMEI_2? (Put your second IMEI number)
10. Reboot your phone and check you IMEI number (Dial *#06#).

Special thanks:
NEAD SICNARF ONAAMID

Lord Alzer Tinampay CasiƱo

Monday, May 16, 2016

How to fix bootloop Myphone My36 via Wiko Fever Firmware

How to fix bootloop Myphone My36 via Wiko Fever Firmware


This tutorial teach you on how to fix bootloop and deadboot for Myphone My36. Since we still no available stockrom for My36 we will use Wiko Fever firmware which OTA of this phone. This already tested of our members. To flash this firmware you need to download all needed requirements. Just follow my instructions carefully.
How to fix bootloop Myphone My36


Requirements:
WIKO FEVER STOCKROM
PC/LAPTOP(WINDOWS OS)
USB CABLE
PHONE


FOR WINDOWS XP/7 -INSTALLING DRIVERS
1. Download Mediatek Driver and Extract then Install the driver for 32 or 64 bit operating system of windows 7.
Driver Choose 32 or 64 bit
2.  Before you plug your phone in PC, you need to focus in Device Manager, then plug your phone without the battery you only have approximately 5 seconds to appear MT65xx device that shows under Other devices, you need to right click it as soon as you see it.
MTK USB PORT

Then after you rightclick, click to Update driver software

3. Then choose - Browse my computer for driver software
Browse Driver

Browse the Mediatek MT65xx Preloader Driver folder

Make sure you know the version of OS to choose the right driver for your PC.

Choose your OS version, then choose if 32-bit or 64-bit for your PC.

E.G. s Win7  folder:
usb2ser_Win7.inf - if 32-bit
usb2ser_Win764.inf - if 64-bit

4. Another options, to find right driver for your phone is to open your internet while your phone is connected without the battery and automatically searching driver for your phone.

FOR WINDOWS 8/8.1/10 -INSTALLING DRIVERS
1. Download all necessary files and Enable USB Debugging mode in your phone..
2. Install Drivers USB_VCOM_Driver.rar
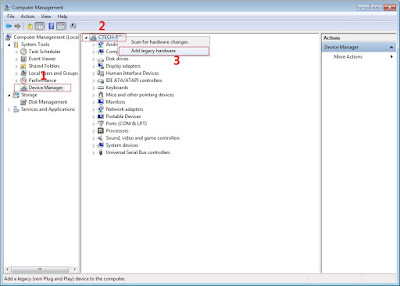
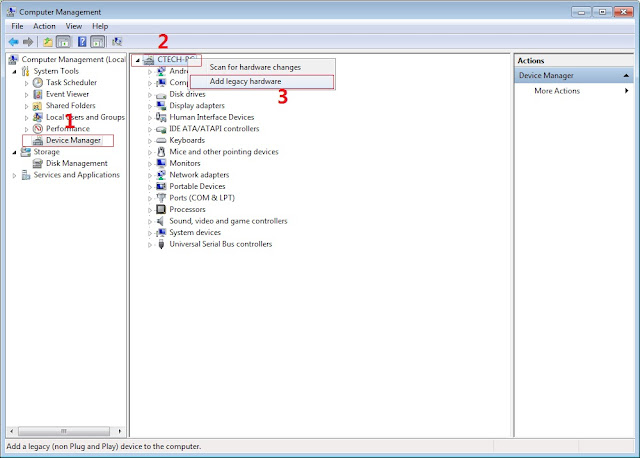
In Device Manager Right click on PC name(Right Side) and then click on Add legacy hardware as shown in image below.

add legacy
Now in Add Hardware Wizard click on Next » Install the Hardware that i manually select from a list (Advanced) » Show All Devices » Next » Have a Disk, Now select the any inf file from where you extracted the downloaded VCOM driver package.

mediatek preloader

3.  Now Click on Next and select Install this driver software anyway and wait for finishing the process.

Install driver anyway

4.  After installation is finished then Restart your computer, That's it.
If still not success in installing driver just Disabled Driver Signature Verification
1. Go to PC Settings>General>Troubleshoot>Advanced Options>Startup Settings>Disabled Driver Signature Enforcement>Then Restart
disabled driver signature verification
Once you disabled. Then follow the procedure above to install the driver. Once success proceed to next step.
5. Download SP_Flash_Tool_v5.1352.01.rar and extract then click flash_ tool to open
Click Flash tool

6. Click Scatter_loading and open your scatter file like image below(I'm using mt6572 scatter File)

Click Scatter Loading


7. Check all except preloader. (If your device is hardbrick/deadboot apply check in preloader)

Uncheck Preloader


8. Click download
Click Download


9. Wait until green circle appear

SPFT SUCCESS GREEN CIRCLE


Remove your phone to usb cable then insert your battery and On your android phone..Enjoy!

Note: If not reboot try factory reset in recovery mode of your phone.

Friday, April 22, 2016

[ROM] Cloudfone Excite Prime Stock Odex


cloudfone stockrom


Note:
  • Backup first your DATA and System before flashing this rom
  • I'm not responsible on your device if you did not follow the instructions below
Changelog:
  • Remove additional apps
  • Remove Kitkat app icons
Instructions:
For TWRP:
  1. Download this Rom and put it on your SD Card
  2. Go to TWRP recovery > Wipe > Factory Reset
  3. Go back to recovery and Tap Install
  4. Find the rom and install it
  5. Wait until its finish
  6. If it is finish then Tap Wipe Cache/Dalvik
  7. Install the SuperSU-V2.70.zip below(Optional if you want to root it)
  8. Reboot
  9. Wait until it opens
  10. Done
For CWM and CTR:
  1. Download the Rom and put it on your SD Card
  2. Go to CWM/CTR recovery Wipe Data, Cache, and Dalvik Cache
  3. Tap install update from sdcard
  4. Find the rom and install it
  5. Wait until its finish
  6. Install the SuperSU-V2.70.zip below(Optional if you want to root it)
  7. Reboot
  8. Wait until it opens
  9. Done
Links:
Credits:
  • Josiah Tingzon (For stock rom)
  • Rotciv Yodnas (For boot.img)
  • Eljay Dulin (For META-INF)
  • Maximum Dev/Port Team
  • CEP Tech Support Porting Team
  • Cherry Mobile Amber 2 UNITED
  • Cloudfone Excite Prime Tech-Support™ Group

Friday, March 18, 2016

[ROM] Firefly Intense Desire StockRom flash via TWRP

[ROM] Firefly Intense Desire StockRom flash via TWRP

Firefly Mobile Intense Desire Stockrom


This is flashable stockrom of Intense Desire with init.d support. 

MUST READ THIS FIRST BEFORE FLASHING OR DOWNLOADING!!! BACKUP FIRST! Especially your NVRAM or IMEI.


  • Deodexed
  • Rooted
  • Busybox Installed
  • Zipalign
  • ADB Insecured
  • with init.d support


  • ROM Flashing Instructions: Using TWRP
    1. Boot to Recovery Mode.
    2. Tap Wipe Menu
    3. Tap Wipe Data-Factory Reset
    4. Tap Wipe Cache
    5. Tap Wipe Dalvik-Cache
    6. Install FFID_StockRom.zip
    7. Reboot.
    Link: Click Here

    Credits

    Janeth Villafuerte
    Madefu Blue
    FFID Admins
    Nameless Porting Team
    Maximum Porting Team
    superr XDA

    Thursday, February 18, 2016

    [ROM] Cherry Mobile Flare X V2 Stockrom V05

    [ROM] Cherry Mobile Flare X V2 Stockrom V05

    Cherry Mobile Flare X V2 Rom


    MUST READ THIS FIRST BEFORE FLASHING OR DOWNLOADING!!! 
    BACKUP FIRST! Especially your NVRAM or IMEI.

    • Cherry Mobile Flare X V2 StockRom Build Number Cherry_Mobile_Flare_X_V5.0
    • Deodexed
    • Rooted
    • Busybox Installed
    • Zipalign
    • ADB Insecured

    ROM Flashing Instructions: Using TWRP
    1. Boot to Recovery Mode.
    2. Tap Wipe Menu
    3. Tap Wipe Data-Factory Reset
    4. Tap Wipe Cache
    5. Tap Wipe Dalvik-Cache
    6. Install FlareX_V5.0.zip
    7. Reboot.

      LINK: Click Here

    Special Thanks:
    Nikolai Zinoviev
    Credits:

    Wednesday, February 17, 2016

    [ROM] Lenovo A7000-a_PLUS_S177_160121_ROW Stockrom via TWRP


    Lenovo A7000 plus Stockrom
    Lenovo A7000 plus Stockrom2

    Lenovo A7000 plus Stockrom3

    Lenovo A7000 plus Stockrom4


    MUST READTHIS FIRST BEFORE FLASHING OR DOWNLOADING!!! BACKUP FIRST! Especially your NVRAM or IMEI. 


    • Lenovo A7000-a_Plus Stockrom
    • Build Number:  Lenovo A7000-a_PLUS_S177_160121_ROW
    • Rooted
    • Deodex
    • Zipalign
    • Busybox installed
    • Debloated
    • Jetaudio Music Player installed
    • Greenify v2.7.1 Installed
    • Titanium Back-Up 7.3.0 Installed
    • XposedInstaller_3.0_alpha4 installed
    • Quickboot Installed
    • Root Explorer v3.3.7 Installed
    • adb insecured

    ROM Link:


    init.d enabler link: 


    ROM Flashing Instructions: Using MOD TWRP v3.0.0


    1. Boot to Recovery Mode.
    2. Tap Wipe Menu
    3. Swipe to Factory Reset
    4. Tap Back
    5. Tap Install
    6. Flash Lenovo A7000-a_PLUS_S177_160121_ROW.zip
    7. Flash init.d enabler (optional)
    8. After flashing the ROM power off your device, remove your sim card after the setup you may now insert your sim card. 

    CREDITS


    • Nikolai Zinoviev
    • XDA
    • superr
    • Nigel Esteves
    • Lynx Porting Team
    • Nameless Porting Team

    Sunday, November 22, 2015

    How to change firmware of Cherry Mobile Cubix Cube 2 to Jiayu G6 Stockrom via SPFT

    How to change firmware of Cherry Mobile Cubix Cube 2 to Jiayu G6 Stockrom via SPFT
    This tutorial is able to help you oh how to change firmware of CM Cubix Cube 2 to Jiayu G6 Stockrom via SPFT, the fact that OEM of Cubix Cube 2 is Jiayu G6 so this is 100% compatible to flash this firmware. I suggest to backup your IMEI first and backup your ROM.

    cherry-mobile-cubix-cube2


    Pros
    This Rom has partition internal memory divided into two drive unlike in CM Cubix Cube 2 hence that this device have  internal memory only . This can help you to save file in other drive of your phone.

    Cons
    This more complicated procedure you need PC for flashing.


    Requirements:
    PC
    USB Cable

    Download Links:
    Mediatek VCOM Drivers
    Jiayu G6 Stock rom


     Instructions
    1. Download all necessary files and Enable USB Debugging mode in your phone..
    2. Install Drivers USB_VCOM_Driver.rar
    In Device Manager Right click on PC name(Right Side) and then click on Add legacy hardware as shown in image below.

    Screenshot alt="SPFT Screenshot 1"
    Now in Add Hardware Wizard click on Next » Install the Hardware that i manually select from a list (Advanced) » Show All Devices » Next » Have a Disk, Now select the any inf file from where you extracted the downloaded VCOM driver package.

    Screenshot 1

    3.  Now Click on Next and select Install this driver software anyway and wait for finishing the process.

    Screenshot 2

    4.  After installation is finished then Restart your computer, That's it.
    5. Open flash_tool.exe, click on the Download Tab
     Extract the downloaded Jiayu g6 stock rom to the new folder you created.
    Click Flash Tool

    6. In SPFT, Click Scatter-loading and browse for the scatter file (MT6592_Android_scatter)
    7.Make sure flashing mode is set to  "Download+Format" and check all.
    8. Click Download.
    9. Turn off your phone, connect your phone to the PC and wait for the flashing to commence.
    10. Green Circle image with check will show once flashing is completed. That's it!
    11. Disconnect your phone in USB cord then open if still bootloop then try to factory reset in recovery settings. To go in recovery mode, Just reboot your phone hold and press power on and volume up simultaneously until recovery mode appears.


    Credits:
    Needrom
    Gio for testing
    Cube Cubix2 group


    Wednesday, November 11, 2015

    How to fix bootloop in Alcatel Flash 2 included Stock Rom flash via SPFT

    How to fix bootloop in Alcatel Flash 2 included Stock Rom flash via SPFT
    This tutorial is able to help you oh how to fix bootloop and hardbrick in Alcatel Flash 2.
    In case you don't have backup and installed custom recovery you can proceed in this procedure.
    How to fix bootloop Alcetel Flash 2


    Requirements:
    PC
    USB Cable

    Download Links:
    Mediatek VCOM Drivers
    AFP2 Stock rom(v2.9 lollipop)


     Instructions
    1. Download all necessary files and Enable USB Debugging mode in your phone..
    2. Install Drivers USB_VCOM_Driver.rar
    In Device Manager Right click on PC name(Right Side) and then click on Add legacy hardware as shown in image below.

    How to fix bootloop in Alcatel Flash 2 Screenshot 2
    Now in Add Hardware Wizard click on Next » Install the Hardware that i manually select from a list (Advanced) » Show All Devices » Next » Have a Disk, Now select the any inf file from where you extracted the downloaded VCOM driver package.

    How to fix bootloop in Alcatel Flash 2 Screenshot 3

    3.  Now Click on Next and select Install this driver software anyway and wait for finishing the process.

    How to fix bootloop in Alcatel Flash 2 Screenshot 4

    4.  After installation is finished then Restart your computer, That's it.
    5. Open flash_tool.exe, click on the Download Tab
     Extract the downloaded AFP2 stock rom to the new folder you created.
    How to fix bootloop in Alcatel Flash 2 Screenshot 5

    6. Click Scatter-loading and browse for the scatter file (MT6753_Android_scatter)
    7. For Bootloop only
     Make sure flashing mode is set to "Download Only" and check mark all except Preloader.
    Note: If deadboot/hardbrick set "Download+Format" and check Preloader.
    8. Click Download.
    How to fix bootloop in Alcatel Flash 2 Screenshot 6

    9. Turn off your phone, connect your phone to the PC and wait for the flashing to commence.
    10. Green Circle image with check will show once flashing is completed. That's it!

    How to fix bootloop in Alcatel Flash 2 Screenshot 7

    11. Disconnect your phone in USB cord then open if still bootloop then try to factory reset in recovery settings. To go in recovery mode reboot your phone hold and press power on and volume up simultaneously until recovery mode appeared.

    Credits:
    Long nt for rom
    AFP2 Group