Thursday, December 3, 2015

[TUT] How to fix Bootloop/Deadboot of Lenovo A7000 plus

[TUT] How to fix Bootloop/Deadboot of Lenovo A7000 plus

Fix Bootloop in Lenovo A7000 plus


Requirements:
Download all and extract:
LenovoUsbDriver_1.0.14.rar
SP_Flash_Tool_v5.1516.00.rar
LENOVO A7000 PLUS S141_1509022 FIRMWARE

1. Make sure you have enough Battery atleast 60% and above.
2. Download and extract LenovoUsbDriver_1.0.14.rar then install AIO_LenovoUsbDriver_autorun_1.0.14.exe in PC
3. Download and extract SP_Flash_Tool_v5.1516.00.rar and open folder then click flash_tool.exe
SPFT Setup 1
4. Run Flash_tool.exe, press the button Scatter-loading MT6752_Android_scatter.txt and select the folder with the firmware.
5. Be sure to put a check DA DL All With Check Sum in the menu Options-Options-Download.
6. Arrange the Firmware-Upgrade instead of the Download Only.
7. Push the button Download. 
8. Connect the phone while in off. 
9. If everything is correct, the "runners" color bars  and the status of the green circle appear in  a couple of minutes, to indicate the success of the operation.
10. Enjoy!.


Credits:
Nigel Esteves
Lenovo
Lenovo A7000 plus Group

How to root and Flash TWRP in Lenovo a7000

How to root and Flash TWRP in Lenovo a7000 


Root and Install TWRP in Lenovo A7000 plus


Warning: Rooting can void your warranty! Do it at your own risk!

Requirements:
Download all and extract:
LenovoUsbDriver_1.0.14.rar
SP_Flash_Tool_v5.1516.00.rar
TWRP_2.8.6.0.rar
UPDATE-SuperSU-v2.46.zip


Installing CWM/TWRP recovery in Lenovo A7000 via SPFT

Procedure:
  1. Make sure you have enough Battery atleast 60% and above.
  2. Download and extract LenovoUsbDriver_1.0.14.rar then install AIO_LenovoUsbDriver_autorun_1.0.14.exe in PC
  3. Download and extract SP_Flash_Tool_v5.1516.00.rar and open folder then click flash_tool.exe
SPFT Setup 1


 4. Click Scatter-loading and browse for the scatter file included in the  (TWRP_2.8.6.0.rar or K3_Note_TWRP_2.8.7.0.rar) you can choose any of this two recovery then click  (MT6752_Android_scatter)
.5.  Make sure flashing mode is set to "Download Only" and check mark only on the Recovery.

SPFT Setup 2

6. Click the Download button
7. Plug and connect Lenovo A7000  to PC /computer via USB cable without unplugging battery and without pressing any button.
8. Wait some time to receive notification Download OK and green check icon
9. Done, please unplug the Lenovo A7000 of PC / computer and into TWRP Recovery by pressing and holding all buttons (volume up + power button + volume down) until the  TWRP appear. done!


ROOT way through TWRP

To root:


  1.  Download UPDATE-SuperSU-v2.46.zip and move in your sdcard.
  2.  Reboot your  phone then press and hold Vol Up + Power On the TWRP Recovery , click Install.
  3. TWRP SUCCESS INSTALLING IN LENOVO A7000
  4.  Select UPDATE-SuperSU-v2.46.zip.
  5.  Flash it, no need to wipe cache, you can reboot as it is.
  6.  Enjoy your rooted Lenovo A7000 .

Then download Root checker in Playstore to verified. Enjoy!

Note: Do not update via OTA. Please unroot first.


Credits:
4pda.ru
svyato15

[TUT] How to fix Bootloop/Deadboot of Lenovo A7000

[TUT] How to fix Bootloop/Deadboot of Lenovo A7000

How to fix Bootloop in Lenovo A7000


Requirements:
Download all and extract:
LenovoUsbDriver_1.0.14.rar
SP_Flash_Tool_v5.1516.00.rar
LENOVO A7000 FIRMWARE

1. Make sure you have enough Battery atleast 60% and above.
2. Download and extract LenovoUsbDriver_1.0.14.rar then install AIO_LenovoUsbDriver_autorun_1.0.14.exe in PC
3. Download and extract SP_Flash_Tool_v5.1516.00.rar and open folder then click flash_tool.exe
SPFT Setup 1
4. Run Flash_tool.exe, press the button Scatter-loading MT6752_Android_scatter.txt and select the folder with the firmware.
5. Be sure to put a check DA DL All With Check Sum in the menu Options-Options-Download.
6. Arrange the Firmware-Upgrade instead of the Download Only.
7. Push the button Download. 
8. Connect the phone while in off. 
9. If everything is correct, the "runners" color bars  and the status of the green circle appear in  a couple of minutes, to indicate the success of the operation.
10. Enjoy!.
Credits:
4pda.ru
mischa90542
svyato15

Rip Christmas Blu-ray to Multi-track MP4 for Playing on your Tablets

Summary: This guide provides a simple way to convert Blu-ray movies on Apple/Android/Windows tablets in multi-track MP4 format so you can switch to the desired language during playback.

To take the cinema with you as you travel, you can consider to rip your large Blu-ray collection for watching on your portable tablets. Then it will be possible to end up bored or if you are travelling most of the time. With all your Blu-ray videos on your mobile device, you will be entertained for many hours.

In addition, you may find most Blu-rays include multiple audio and subtitle tracks so that people from different countries who speaking different languages can enjoy same movies in their native languages, so is it possible to freely swithing language while playing them in your Apple/Android/Windows tablets?

To accomplish this goal, you need a powerful Blu-ray Ripper to assist with the process of ripping Blu-ray Disc to MP4 file with multiple audio and subtitle streams and you can easily switch audio and subtitle tracks with freely chapter switching.

Pavtube ByteCopy, is such a tool for you. It is a new released BD/DVD backup and ripping program, supports to preserve multiple audio and subtitle streams and leave out unwanted ones, retain chapter information, allow editing videos, etc. Here is the reivew

Note: For Mac users, you can turn to Pavtube ByteCopy for Mac to Rip Blu-ray to Multi-track MP4 on Mac OS X El Capitan.  

Here we present you a brief instruction about keeping multiple audio and subtitle streams when converting Blu-ray Disc to MP4 for enjoying on all your portable tablets.

Free Download and trail: 


Other Download:

- Pavtube old official address: http://www.pavtube.cn/bytecopy/
- Cnet Download: http://download.cnet.com/Pavtube-ByteCopy/3000-7970_4-76158512.html

Good News! To thanks for your continuous support, Pavtube Official Website and Pavtube Facebook are now holding the biggest sale for this Thanksgiving Day, Black Friday Holiday Cyber Monday Crazy Promotion with fantastic 50% off discounts and giveaway. Pay less to get powerful Blu-ray/DVD/Video Converter to build your own home media center on your becoming Christmas!

Step 1. Load source Blu-ray Disc

After successful installation of ByteCopy, launch it, click “Add Disc” icon to add source Blu-ray Disc from disc driver. Or load from BD folder or ISO/IFO file.


Step 2. Choose output format.

Click the Format button, and you would see lots of profiles listed. To keep multiple audio and subtitle tracks from Blu-ray Disc, you are recommended to choose “Multi-track Video” > “Multi-track MP4 (*.mp4)" for output.


Ps: If you want to lossless backup Blu-ray/DVD to MKV with multiple audio tracks and subtitles preserved for freely swithing language while watching movies, choose "Lossless/encoded Multi-track MKV (*.mkv)

Tip: If you want to remove unwanted audio or subtitle stream from original Blu-ray for output, just unselect the box in front of it.


Step 3. Convert Blu-ray Disc with multiple audio and subtitle steams.

Click the Convert button to start converting Blu-ray to MP4 with original subtitles, audios and chapters you choose. Find generated mp4 files by clicking “Open” icon and you can transfer and play Blu-ray Disc with multiple audio and subtitle streams on your Apple/Android/Windows tablets. And you can choose your desired audio stream.

Related Guide:

  • Convert DVD movies to MOV with multiple audio & subtitle tracks
  • Getting Blu-Ray into Apple TV 3 with 5.1 audio on Mac
  • Best Way to Play Blu-ray via AC Ryan Media Player
  • Chromecast MKV- Solve MKV files won't transcode to Chromecast issue
  • View Blu-ray Movies on XBMC player via network
  • Tuesday, December 1, 2015

    Watch Blu-ray Movies on iPad Pro at Christmas Party

    Christmas day is comming soon. Are you seeking for a Blu-ray to iPad Pro Ripper when the Boring Party Time? The iPad Pro is Apple's largest iPad yet, with a 12.9-inch 2732 x 2048 resolution display, a powerful A9X processor, a super slim design, and a four-speaker audio system. The 12.9 inch screen makes everything you do - editing 4K video, designing presentations, running a business, easier, faster, and more engaging. With that in mind, it is tempting to get this glamorous gadget for watching Blu-ray movies and videos on its HD retina display. 

    Although the new 12.9-inch iPad Pro with Retina display, it is still unable to play Blu-ray Disc. To save Blu-ray on iPad Pro for convenient access, you will first need to remove Blu-ray protection, then transcode Blu-ray to iPad Pro supported video files workable MP4 format. Here, you might consider BDMagic for Mac. We haven't used it, but user reviews are very good. Read the review.   

    Tips for Apple users to know Supported Formats: Best Formats for Mac | Apple TV Supported format | iTunes Supported format | iPad Mini 3 Best Video Formats | iPhone 6 Video/Audio Formats

    Pavtube BDMagic for Mac such an all-in-one Blu-ray to iPad Pro Converter on Mac that can accomplish this in a few clicks. It's great for newbies that are blown away by format settings like codec, resolution, bit rate, frame rate, audio channels, etc. The app, unlike most BD/DVD ripping software, features intuitive interface and provides users with presets for all popular iPad models. (yet it allows you to adjust the bit rate, frame rate, etc of preset formats as long as you like). The Windows equivalence to convert Blu-ray on iPad Pro is Pavtube BDMagic

    Now, just free download Blu-ray to iPad Pro Converter: 


    How to rip and copy Blu-ray to iPad Pro friendly video Formats for viewing

    Step 1. Load Blu-ray to Pavtube BDMagic for Mac.

    Run this Pavtube Blu-ray to iPad Ripper, click the top left icon, you can choose to import Blu-ray/DVD from ROM with BD drive, Blu-ray/DVD folder or Blu-ray/DVD ISO/IFO. It will check the main title by default; moreover, ISO files could also be recognized automatically so that you no longer need to run virtual drive to mount it.


    Step 2. Choose MP4 for playing on iPad Pro. 

    Under "Format" menu, there are lots of video formats. Move your cursor to "iPad" category to choose "iPad Video H.264(*.mp4)", or you can try the small search box on the bottom right corner and select the exact output formats for your iPad. 

    P.S. If you want to copy DVD onto Seagate wireless plus hard drive, select "Common Video > H.264 Video(*.mp4)".


    Step 3. Start Blu-ray to iPad Pro conversion.

    Click big "Convert" button to start conversion. It won't take much time for conversion and then you will get the converted mp4 once completed. Hit "Open" button you will go to location of generated files. Then, you can streamconverted video files to iPad. Now you can directly play Blu-ray on iPad on the go as you wanna.

    More features in BDMagic for Mac:

    * Full Disc Copy can 1:1 backup the whole Blu-ray/DVD disc with original structure including chapter markers.

    * Directly Copy will backup 100% intact Blu-ray/DVD main movie with all the multiple tracks excluding menu.

    * You can edit the BD/DVD video before conversion including trim, crop, effect, etc, add *sst and *ass subtitle into video part and so on. 

    Read More:
    Source:http://bluraydtstruehd.com/2015/09/rip-blu-ray-to-ipad-pro/

    Monday, November 30, 2015

    [TUT] how to fix bootloop on Cherry Mobile Cubix Cube 2

    This tutorial is able to help you oh how to fix bootloop on CM Cubix Cube 2

    Fix Bootloop of CM Cubix Cube 2


    Requirements:
    PC
    USB Cable

    Download Links:
    Mediatek VCOM Drivers
    Cherry Mobile Cubix Cube 2 Stockrom


     Instructions
    1. Download all necessary files and Enable USB Debugging mode in your phone..
    2. Install Drivers Mediatek VCOM Drivers
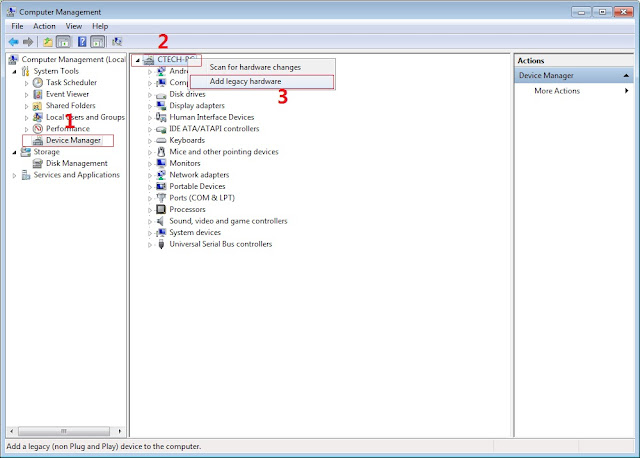
    In Device Manager Right click on PC name(Right Side) and then click on Add legacy hardware as shown in image below.

    SPFT Screenshot 1
    Now in Add Hardware Wizard click on Next » Install the Hardware that i manually select from a list (Advanced) » Show All Devices » Next » Have a Disk, Now select the any inf file from where you extracted the downloaded VCOM driver package.

    SPFT Screenshot 2

    3.  Now Click on Next and select Install this driver software anyway and wait for finishing the process.

    SPFT Screenshot 3

    4.  After installation is finished then Restart your computer, That's it.
    5. Open flash_tool.exe, click on the Download Tab
     Extract the downloaded Jiayu g6 stock rom to the new folder you created.
    Click Flash Tool

    6. Click Scatter-loading and browse for the scatter file (MT6592_Android_scatter)
    7. For Bootloop only
     Make sure flashing mode is set to "Download Only" and check mark all except Preloader.
    Note: If deadboot/hardbrick set "Download+Format" and check Preloader.
    8. Click Download.
    9. Turn off your phone, connect your phone to the PC and wait for the flashing to commence.
    10. Green Circle image with check will show once flashing is completed. That's it!
    11. Disconnect your phone in USB cord then open if still bootloop then try to factory reset in recovery settings. To go in recovery mode reboot your phone hold and press power on and volume up simultaneously until recovery mode appeared.


    Credits:
    Gio for rom
    Cube Cubix2 group

    Sunday, November 29, 2015

    How to root MyPhone Rio 2 and Flash Philz Recovery

    How to root MyPhone Rio 2 and Flash Philz Recovery

    My Phone Rio 2 Root and Flash Philz

    Warning: Rooting can void your warranty! Do it at your own risk!

    Requirements:
    Rio 2
    internet/data/wifi
    Kingroot4.1.zip (download and extract)


    Procedure:

    1. First of all download full APK file of kingroot.
    2. If you use your computer to download the file, then you need to transfer in your device.now open the APK file with your phone file manager.
    3. before installing this app first ensure that you have allowed third party installations in your device you can check this option by your device setting.
    4. Go To Setting > Security > and there you can tick the “Unknown sources” box.
    5. After successful installation, start the application and wait for Kingroot to fully analyze your device. after a few seconds you will see the main window,
    6. Click the Big Green Circle on your device that says Root and wait for a few minutes make sure you have a good internet connection.
    7. After a few minutes, you should see a tick mark in a green circle and the blue horizontal bar below the green circle, which means that your device has been successfully rooted.
    Screenshot


    Now download rootchecker in playstore to verified!


    Flash TWRP/CTR Recovery

    Requirements:
    Rooted
    recovery_TWRP.img (TWRP)  rename to recovery.img


    Procedure:
    Step 1:Install rashr_tool.apk

    Step 2: Move the recovery.img in your internal memory outside the folder which you can see easily.
    Since Cubix cube 2 has no sdcard.

    Step 3: Open Rashr Tools Grant SuperSu
    Click Recovery from Storage
    Then choose Recovery.img Click OK

    To boot into recovery mode manually, press volume up + volume down + power button

    That's it! You can backup and install your desired custom rom now! ..
    Credits:
    Kingroot
    Rio 2 group
    Klark Luis Peralta for porting philz
    Philz recovery dev