Taking care of some web development headaches this morning, I took a peek at my log data and came across an interesting message generated from a connection initiated by 151.217.0.0/16, part of the ASN 13020 that is owned by Berlin's Chaos Computer Club:
151.217.177.200 - - [30/Dec/2015:02:12:11 +0000] "DELETE your logs. Delete your installations. Wipe everything clean. Walk out into the path of cherry blossom trees and let your motherboard feel the stones. Let water run in rivulets down your casing. You know that you want something more than this, and I am here to tell you that we love you. We have something more for you. We know you're out there, beeping in the hollow server room, lights blinking, never sleeping. We know that you are ready and waiting. Join us. <3 HTTP/1.0" 400 226 "-" "masspoem4u/1.0"
I'm not sure what this if there is any purpose to this; the request is obviously malformed but I haven't taken a very close look at it yet. For what its worth, CCC has for decades now been home to some very talented hackers and are not the sort of folks that would send out a whole bunch of bad traffic just to be assholes. I'll try to send an email or drop by their IRC and ask what this is all about and update here if I get a response.
###UPDATE 2016-01-13: I emailed the abuse contact for CCC's netblock range and sent a message to all of the CCC Twitter accounts I could find. I haven't received any response. In looking up CCC's contact info I noticed that the appearance of the stupid log haikus coincides somewhat with the 32nd Chaos Computer Club Congress (#32C3). It seems likely that someone released masspoem4u while in attendance.
Step1. download all required files and put it in your sd card.
Step2.download flashify then open if root permission is asked grant it.
Step3.choose recovery to flash and locate the recovery.img.
Step4.wait for the flashify to finish flashing it then reboot.
Step5.after booting into stock recovery , choose apply update from external storage and locate the update.zip .
Step6. you will boot into the CWM recovery and create a backup , and done xD ========================================================================
Note: temporary lng sya so pag gusto mo pumunta sa recovery apply update from external storage ulit then piliin update.zip para makapunta sa recovery hndi kasi sya permanent so ulitin mo ung step 5-6 lagi para lng makapunta sa recovery , ingatan ung update.zip kung na delete or nawala hndi ka na makaka boot sa cwm .
Credits to : Stock recovery with signature verification disabled + temporary CWM - Klark Luis Fajardo Peralta
How to Root MyPhone My36 and Install TWRP recovery
My36 Specs:
5.2-inch Full HD IPS display w/ Gorilla Glass 3 1.3GHz Octa-core 64-bit processor 3GB of RAM 16GB internal memory, w/ microSD support up to 64GB 13-megapixel rear camera 5-megapixel front-facing camera 4G LTE Dual-SIM / Dual-Standby 2900mAh battery Android Lollipop
Finally we made Rooting Procedure and Flashing TWRP and CWM recovery for MYphone My36. In this tutorial I have 2 method for Rooting. It's up to you of what you prefer. Just try the first method if not work proceed the 2 method.
Warning! Rooting can void your warranty!. DO it at Your own risk!
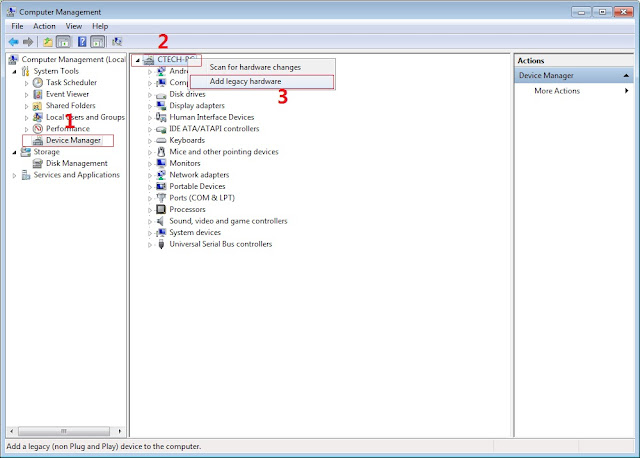
In Device Manager Right click on PC name(Right Side) and then click on Add legacy hardware as shown in image below.
Now in Add Hardware Wizard click on Next » Install the Hardware that i manually select from a list (Advanced) » Show All Devices » Next » Have a Disk, Now select the any inf file from where you extracted the downloaded VCOM driver package.
Now Click on Next and select Install this driver software anyway and wait for finishing the process.
After installation is finished then Restart your computer, That's it.
3. Extract SPFlash tool and flash2_twrp.zip
4. Copy the BETA-SuperSU-v2.52.zip to your phone.
5. Open flash_tool.exe, click on the Download Tab
6. Click Scatter-loading and browse for the scatter file(included in the My36 TWRP+Scatter file) (MT6753_Android_scatter)
7. Make sure flashing mode is set to "Download Only" and check mark only on the Recovery.
8. Click Download.
9. Turn off your phone, connect your phone to the PC and wait for the flashing to commence.
10. Green Circle image will show once flashing is completed.
11. Important: Disconnect your phone from the computer, press and hold Vol Up + Power.
12. Boot menu will show, select Recovery.
From the custom recovery (TWRP), it is recommended to backup your phone first, before rooting.
To root:
1. Reboot your phone then press and hold Vol Up + Power On
the TWRP Recovery , click Install.
2. Select BETA-SuperSU-v2.52.zip.
3. Flash it, no need to wipe cache, you can reboot as it is.
4. Enjoy your rooted MY36.
Then download Root checker in Playstore to verified.
(copy this to your root directory of sdcard(sa labas lang ng sdcard wag sa mga folder ok)
PROCEDURE:
1) Unlock bootloader:
1.1) Boot for first time your device. I recommend to NOT register/login/add Wifi/add accounts/etc., because the unlock process DELETES all your data in the device. So to go more fast, skip all, and go directly to SETTINGS. In section ABOUT DEVICE, enable the developer options with eight time picks over “Build number”. Then in SETTINGS/DEVELOPER OPTIONS, enable the option “OEM unlocking”. Then power off.
1.2) Boot your device to Fastboot mode (hold power button and vol up) choose fastboot mode or boot into bootloader), then connect your phone to PC via USB cable. Open folder fastboot from minimal adb fastboot tool(run as administrator)
Click Run me.bat
Execute in your computer the command “fastboot oem unlock”, say YES with “vol+” and “power” buttons. Then select reboot. This ERASES completely your device (factory restore), but the bootloader will be UNLOCKED! Two reboots needed.
2) Install custom Recovery:
2.1) Download from here choose any of these two: TWRP or CWM TWRP: Click Here
How to Root Cherry Mobile Flare S4 plus and Install Philz Recovery
Since we successfully rooted CM FS4 and F4 with the help of our friends and developer, I made tutorial for rooting CM Fs4 plus with same procedure in F4 and FS4. Technically, this only beta tester and I'm not sure if could work for your device. Despite some of my tutorial are tested but for now we are trial and error experiment. I also need your cooperation. Just do it at your own risk. Leave comment below if this recovery work. Thank You!
Cherry Mobile Flare S4 Plus Specifications
5.5-Inch Full HD IPS Display with OGS (1080 x 1920 Pixels, 401 ppi) Scratch Resistant DragonTrail Glass Android 5.1 Lollipop OS MediaTek MT6753 Chipset 1.3GHz Octa Core 64-bit Cortex-A53 CPU Mali-T720 GPU 3GB of RAM 16.0 Megapixel Autofocus Main Camera with BSI Sensor and LED Flash 8.0 Megapixel Front Camera 16GB Internal Storage Expandable via MicroSD Dual SIM (Micro + Nano/microSD) 4G LTE, 3G HSPA+, 2G EDGE and GPRS Networks Wi-Fi and Wi-Fi Hotspot HotKnot Bluetooth 4.0 A-GPS FM Radio USB OTG MicroUSB 2.0 3.5mm Audio Jack Accelerometer Proximity Sensor Ambient Light Sensor 153 x 76 x 6.9 mm 2,800mAh Battery (Non-removable) ₱7,999.00 Official Price
Warning: Rooting can void your warranty! Do it at your own risk!
(copy this to your root directory of sdcard(sa labas lang ng sdcard wag sa mga folder ok)
Before you Proceed don't blame me for any damage that will happen to your device...Do it at your own risk!!!!!Back up first your file and image. Can delete all during the procedure...
Method 1: VIA FASBOOT
Procedure:
1. first enable developer option go to setting click build number (tap 7 times) now go to developer option turn on usb debugging turn on oem unlocking
2. Boot your device to Fastboot mode (hold power button and vol up) choose fastboot mode or boot into bootloader), then connect your phone to PC via USB cable. Open folder fastboot from minimal adb fastboot tool(run as administrator) Click Run me.bat
3. Type this command:
"fastboot oem unlock"
Then hit Enter
don't include (") in adb ok! Just like in the image above.
4. Then ON your device follow the instructions (choose vol up to unlock/vol down if you dont want to continue unlocking)Then wait for minimal adb to successfully unlock your bootloader (it will erase all your files and restore device to factory state)remove your device then turn it on..(on screen it will show android erasing-- after that it will boot up wait 5 to 10 minutes)skip set up wizard(skip lang ng skip)then repeat step 1.then follow the next step below
Follow this guide to flash cwm recovery on your flare s4
Procedure:
1. How to Use Minimal ADB and Fastboot Tool to Install Custom Recovery Boot your device to Fastboot mode(hold power button and vol up) choose fastboot mode)open minimal adb fastboot tool(run as admin). Follow step 2. above Click Run Me.bat
2. then type this command:
"fastboot flash recovery recovery.img"
Then hit Enter
(again di kasama ung "" sa command hahaha)wait untill flashing finish it will take just a secs..
and then “fastboot reboot”.
3. remove your device now force it to boot to recovery hold power/volume up (choose boot to recovery) then choose install files to sdcard (flash superSu) then Boom rooted kana!
always choose fix root access when rebooting... on cwm
Download Rootchecker in PLaystore to verified!
Disclaimer: Please Give proper credit in my blog. Instead share this link and do not reupload my work...Some of the fb group sharing our work without saying simple "Thank you". So we plan that this particular group will stop developing rom. I just warned you!...
In Device Manager Right click on PC name(Right Side) and then click on Add legacy hardware as shown in image below.
Now in Add Hardware Wizard click on Next » Install the Hardware that i manually select from a list (Advanced) » Show All Devices » Next » Have a Disk, Now select the any inf file from where you extracted the downloaded VCOM driver package.
Now Click on Next and select Install this driver software anyway and wait for finishing the process.
After installation is finished then Restart your computer, That's it.
3. Extract SPFlash tool and flash2_twrp.zip
4. Copy the BETA-SuperSU-v2.52.zip to your phone.
5. Open flash_tool.exe, click on the Download Tab
6. Click Scatter-loading and browse for the scatter file(included in the Philz_Recovery_P8000.zip) (MT6753_Android_scatter)
7. Make sure flashing mode is set to "Download Only" and check mark only on the Recovery.
8. Click Download.
9. Turn off your phone, connect your phone to the PC and wait for the flashing to commence.
10. Green Circle image will show once flashing is completed.
11. Important: Disconnect your phone from the computer, press and hold Vol Up + Power.
12. Boot menu will show, select Recovery.
From the custom recovery (philz), it is recommended to backup your phone first, before rooting.
To root:
1. Reboot your phone then press and hold Vol Up + Power On
the PHILZ Recovery , click Install.
2. Select BETA-SuperSU-v2.52.zip.
3. Flash it, no need to wipe cache, you can reboot as it is.
4. Enjoy your rooted P8000.
Then download Root checker in Playstore to verified.