[ROM] Phoenix Vibe 1604 ST For Lenovo A7000 plus (lollipop)
Here's a ROM based on the VibeUI 3.0 ROM for K3 Note (1605 ST). Still on Android 5.1.
Sorry, this is not multilanguage, only English and Chinese because this is a Chinese K3 Note ROM.
LED works and Double Tap to Wake Works.
This is basically the 1604 ST ROM with some of my modifications to make it a bit smoother.
Features: - Basic Google integration is present (Play Store) - Some bloat/Chinese apps removed - Dolby Atmos added - Rooted - Lenovo Apps added (Music, FM, Video Player) - Added some themes to the Theme Center (check Personal -> Theme) - Added a ROW Lenovo Weather Widget that enables weather from places other than China - Some others
2.) For Win 10 Install Drivers USB_VCOM_Driver.rar
In Device Manager Right click on PC name(Right Side) and then click on Add legacy hardware as shown in image below.
Now in Add Hardware Wizard click on Next » Install the Hardware that i manually select from a list (Advanced) » Show All Devices » Next » Have a Disk, Now select the any inf file from where you extracted the downloaded VCOM driver package.
3. Now Click on Next and select Install this driver software anyway and wait for finishing the process.
4.After installation is finished then Restart your computer, That's it.
5. Open flash_tool.exe, click on the Download Tab Extract the downloaded Stock rom to desktop of your computer.
6. Click Scatter-loading and browse for the scatter file (MT6582_Android_scatter)
7. For Bootloop only Make sure flashing mode is set to "Download Only" and check mark all except Preloader. Note: If deadboot/hardbrick set "Download+Format" and check Preloader.
8. Click Download.
9. Turn off your phone, connect your phone to the PC and wait for the flashing to commence.
10. Green Circle image with check will show once flashing is completed. That's it!
11. Disconnect your phone in USB cord then on your phone! If still bootloop Go to recovery mode
Reboot and press vol up and power On button. Then perform Wipe cache and data or Factory reset!
Note: .After Flashing the ROM, you will be stucked up in MyPhone logo. So follow the steps below.
A. Turn Off the Phone
B. Hold Power + Volume Down
C. Go to Signaling Test, and press Menu button.
D. Wait for a while and you will see selections, choose TEST PASS and REBOOT.
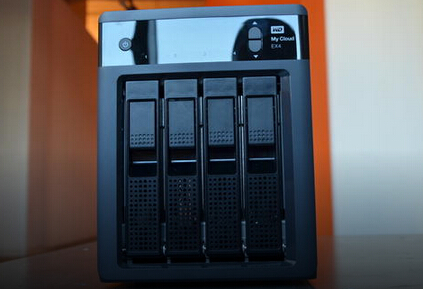
The WD My Cloud EX4 Diskless offers data redundancy, Windows Server integration, and an excellent set of personal cloud features. It makes you stream videos to connected TVs, media players, gaming consoles, and other DLNA/UPnP devices. For those who have large DVD libraries and love to enjoy DVD movies on HD TV but worry about the scratch, ripping and backing up DVD to WD My Cloud EX4 Diskless for HD TV playback is no doubt a good idea. In this way, you can stream your DVD movies on HD TV via WD My Cloud EX4 Diskless without using DVD discs any longer.
This is not hard work under the help of DVD Ripper<DVD Ripper Software vs. DVD Copy Software>. Here I strongly recommend Pavtube BDMagic to help you rip and backup DVD to WD My Cloud EX4 Diskless for HD TV playback. It has the enough function that make me love it:
Steps to Copy DVD to WD My Cloud EX4 Diskless for HD TV Playback
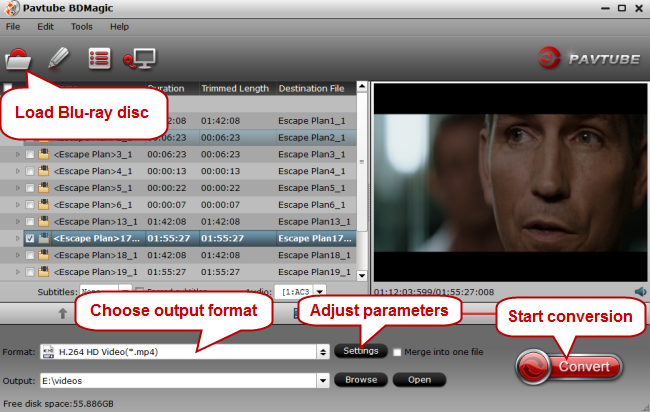
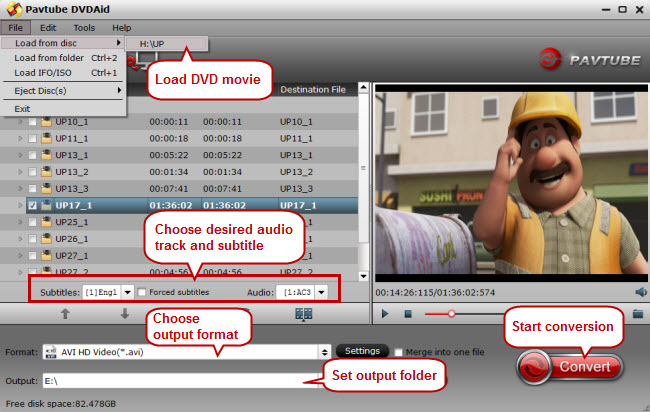
Step 1. Load DVD movies
Insert your DVD disc into a DVD drive, run the program on your computer, on the main interface click "File" > "Load from disc" to import the DVD disc to the program. Please keep in mind that the app supports to convert multiple DVDs to WD My Cloud EX4 Diskless at a time.
Step 2: Set output format
H.264 MP4 format is the most compatible video format for any brand TV. Of course, for better DVD video playback on TV, you can choose the preset in “TVS” profile.
Tips
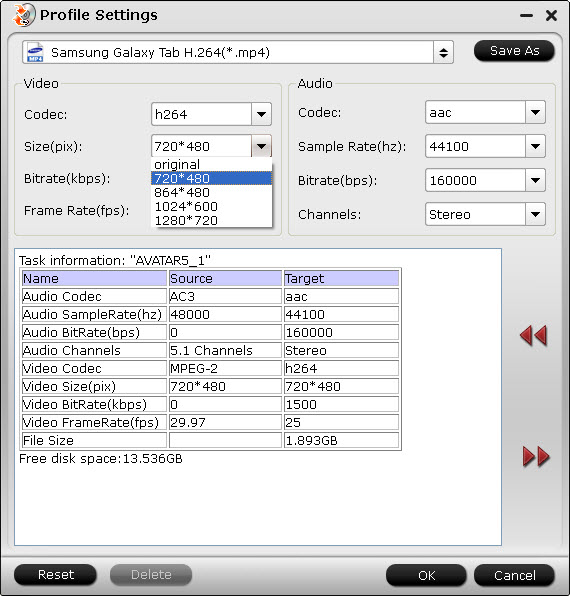
1. Click “Settings” on the interface and you can adjust the parameters including size, bitrate, frame rate, etc. to get a high quality of output files or a smaller files size. You can preview the size at the below chart.
Keep in mind the file size and video quality is based more on bitrate than resolution which means bitrate higher results in big file size, and lower visible quality loss, and vice versa.
2. Open "Video Editor" window and switch to the "Trim" tab, you can drag the slider bars to include the segment you want to remain, click the left square bracket to set start point, and click the right square bracket to set end point when previewing the video or directly input specific values to "Start" and "End" box.
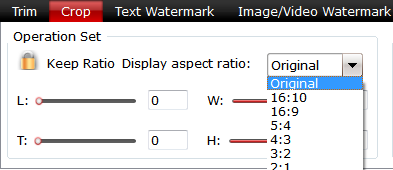
3. Open "Video Editor" window, switch to and click "Crop" tab, click the icon on the right-bottom to swtich to the advanced mode, then you can choose the output aspect ratio such as 16:10, 16:9, 5:4, 4:3 and 2:1 from the drop-down list of "Display Aspect Ration".
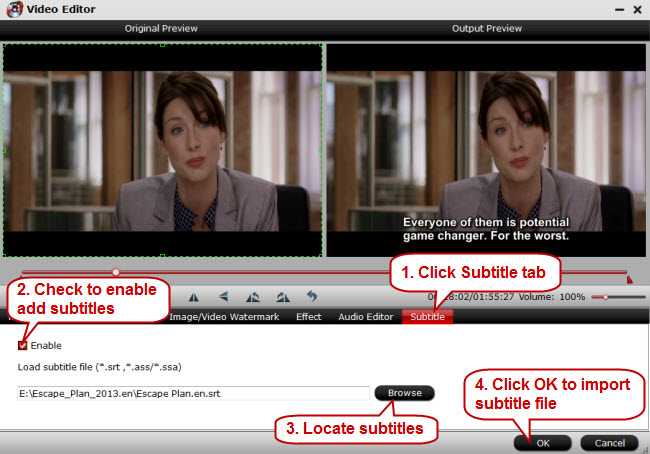
4. Click the "Subtitle" tab in "Video Editor" window, check "Enable", then you will be able to add external SRT/ASS/SSA subtitle files to the video as hard subtitles.(Difference between soft subtitles and hard subtitles)
Step 3: Start to convert DVD to WD My Cloud EX4 Diskless for HD TV
Switch back to the main interface, click the big button "Convert" on bottom-right corner to start conversion. When the process is over, you can find the converted files by clicking the "Open output folder" on the main interface of the program.
Now, you can access your ripped DVD movies on HD TV with Plex app via WD My Cloud EX4 Diskless.
Did you have a PayPal account between April 2006 and November 2015? During that time, did PayPal ever place a hold or reserve on your account? Did PayPal suspend or cancel your account? Than this post is good news for you.
Zepeda v. PayPal (Case No. 10-CV-02500), a class action lawsuit that has been working its way through the United States District Court for the Northern District of California, appears to have been resolved with PayPal offering to pay a cash settlement to PayPal account holders whose assets were essentially seized by PayPal. PayPal is an enormous company with millions of customers and a lengthy track record of having sticky fingers when it comes to transactions that violate PayPal's nebulous and ever-changing terms of service - this settlement will almost certainly be enormous, as well. In addition to essentially stealing from their own customers, the Zepeda suit brought to light evidence that PayPal has violated several rules of the Electronic Fund Transfer Act.
All PayPal users should review the lawsuit settlement's webpage accountholdsettlement.com, which is the easiest way to submit a claim to receive part of the cash settlement. The site also contains the formal notice of court deadlines and requirements.
Why am I writing a post about this? PayPal was required to notify all of their users of the settlement via email (you should be able to view a copy of the email I received here) - so everybody already knows about this right? Well, the problem is that a substantial number of people who would be eligible for receiving a settlement will disregard the one email notification that PayPal is required to send them, because it looks like spam or some worthless service announcement message. Courts in the United States have long relied on dubious forms of notification in civil matters, and although a direct email is better than other methods that courts have found to be acceptable - like posting a small advertisement in a local newspaper - it still sucks.
I have mixed feelings about the top management of PayPal. Pierre Omidyar is responsible for putting together the excellent news organization First Look Media, which has rapidly overtaken the most established newspapers in the country for producing ground-breaking investigative reporting related to foreign policy and national security (their domestic coverage of policing issues is also great; their domestic political coverage is not so great). Then you have PayPal co-founder Max Levchin go on Charlie Rose to cheerlead for domestic surveillance.
Why do the personal opinions of PayPal's executive staff toward national security have any bearing on this post, which was supposed to be about some lawsuit settlement? In the immediate aftermath of September 11th, the US government granted itself extraordinary new domestic surveillance powers. In addition to the listening in on phone conversations, reading emails and sniffing web traffic, law enforcement, regulators and spies forced banks to hand over enormous amounts of data about financial transactions and the banking behavior of their customers. The PayPal brand emerged this same year with X.Com adopting the PayPal label. By 2002, PayPal had an IPO and was acquired by eBay.
PayPal survived the emergence of the US surveillance state by adopting incredibly invasive practices related to the tracking of customers and readily sharing that information with anyone in government who asked for it. It is worth comparing the meteoric rise of PayPal, and the relative silence with which they were greeted by financial regulators, with the stunning accusations of systemic impropriety that have been leveled against those in the Bitcoin business. Despite millions upon millions of dollars from pornography, phishing and other shady operations finding their way through PayPal accounts, only Bitcoin has been labeled as somehow essentially a tool for those profiting from crime, sex and similar seedy operations. PayPal was allowed to operate within existing an regulatory framework, while lawmakers have insisted that new rules must be created to reign in the lawless Bitcoin.
Fifteen years ago, PayPal was seen to be just as disruptive to established financial interests as Bitcoin - both PayPal and Bitcoin allow online commerce without the need for a credit or debit card, after all. The difference is not in the threat to the financial services sector but in the threat to regulators and law enforcement. Where PayPal is centralized and allows for easy snooping of both purchases and money transfers, Bitcoin is de-centralized and can be used to facilitate anonymous online commerce.
With centralization comes corruption, which brings us back to the lawsuit. For some financial services companies, public proof of theft of the course of a decade would lead to going out of business. Yet PayPal survives while the competing Bitcoin is throttled in the crib. Despite evidence of impropriety in financial Bitcoin *exchanges* such as the now-defunct Mt Gox, Bitcoin makes it largely impossible to do what PayPal has been doing - which is seizing customer assets as part of a funds transfer between individuals. Bitcoin makes such a thing impossible because no third party is required to transfer funds (Mt Gox got into trouble during the process of converting Bitcoin to other currencies, which is a different matter - Paypal isn't a currency exchange, so that's a topic for another discussion). Perhaps there are larger lessons to be learned here about the consequences of centralization to innovation and the resulting penalties to consumers. I'll leave that as an exercise to the reader.
[ROM] Sony Xperia E4 Dual Final for SKK Lynx Octa[KNIGHT OWLS]
Please read CAREFULLY:
By installing this Custom Rom, you have reach agreement about all RISK that you'll face! Always make a backup of your current rom before flashing roms.
So Do With Your Own Risk, i'm not a White Mage, so i can't heal your broken device... :v
What's news:
Based on v1.8 Stock Firmware
GAPPS working
Full Root by Kinguser
Full Xperia UI and Framework
All themes are working
Zipalign all system
Supports dual SIM
Good 3G
Good GPS
Working Compass
Working Bluetooth
Working Hotspot
Working all Xperia art Camera
Multi windows
Updatable Xperia Apps via Update Center
Dolby Atmos
Titanium Backup
Xperia Mount SDCard(use this application to mount your sdcard device to PC)
Supports Xposed Installer and modules
Swapped storage fixed
Camera megapixel fixed
Almost all known bugs from previous Xperia E4 Dual already fixed
And many more...
Issues:
Clear Phase and xLoud not working on Setting/sound, so I activate it via build.prop
To be able to send & receive via Bluetooth just simply flash the BT patch included in the shared folder(link)
Default Camera(manual) not usable just disable/freeze it using Titanium Backup Pro. You can use the other camera apps installed in the rom.
How to install: Use TWRP or PhilZ recovery.. It's all up to you!
If the Titanium backup failed to Load because of root failure, just got settings/apps and do a force close titanium backup from there, and run the Kinguser and exit, after that open the Titanium again.
If you can not restore apps and data via Titanium, just go to setting/security and check or thick the unknown sources and restart, after that do a restore apps via Titanium.
To turn off soft button key light, use gravity box module, go to Display tweaks-Button backlight mode and disable button backlight
To turn off the Main navigation key in the main LCD (Back-Xperia-Recent) go to build.prop, find script: qemu.hw.mainkeys=0 and replace 0 to 1 ---> qemu.hw.mainkeys=1 , save and restart.
FINAL NOTE:
If you don't like my ported rom(s) just flash other roms. I am not forcing you to use my ported rom(s) and if you find any other bugs please do inform us in a nice way. We didn't get paid for this so a little respect won't hurt... :D
Samsung announced the new ultraportable here at CES 2016, also debuting a new 15.5-inch Notebook 9 with a super-slim bezel and fast-charging technology. Samsung Notebook 9 weighs just 1.85 pounds and is 0.5 inches thin, making it more than a pound lighter than the Air. With this super-light body and a full 1920 x 1080p display, Samsung Notebook 9 is no doubt a ideal media player for movie fan.
However, when it comes to watching movies, you still can’t beat DVD. Many we loved movies often exist in discs, like The 33. You can’t watch The 33 DVD on Samsung Notebook 9 directly because Samsung Notebook 9 has no DVD drive. You need to extract The 33 content from DVD discs and convert The 33 movie to Samsung Notebook 9 supported format. To reach the goal, you need a DVD Ripper.
Here, Pavtube DVDAid is strongly recommended to help you rip The 33 DVD to Samsung Notebook 9 compatible video/audio format. This DVD ripper software can circumvent copy protection and shift The 33 DVD to MP4 for Samsung Notebook 9 with original video quality.
Other Features of Pavtube DVDAid
Adjust video size, bitrate.
Adjust audio channel, codec.
Adjust display aspect ratio.
Crop black area of The 33 DVD movie
Insert external srt.ssa.ass subtitle to The 33 DVD
Batch conversion
When you inset The 33 DVD to Pavtube DVDAid, the DVD to Samsung Notebook 9 converter can detect the movie and automatically choose the main title of The 33 to convert to Samsung Notebook 9 supported format. It also offer optimized preset for Samsung tablets and smartphones equipped with most compatible A/V parameters.
Insert your DVD disc into a DVD drive, run The 33 DVD to Samsung Notebook 9 converter on your computer, on the main interface click "File" > "Load from disc" to import the The 33 DVD disc to the program.
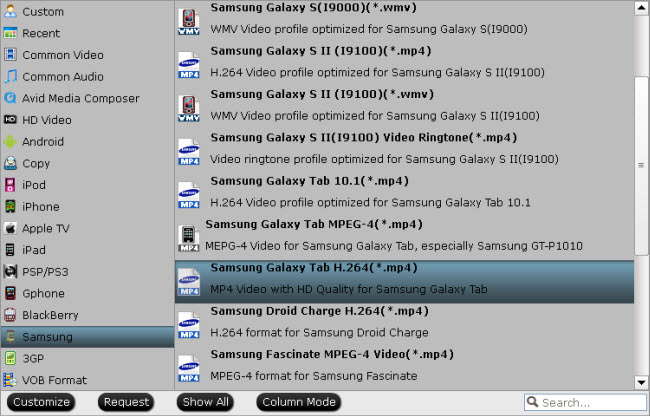
Step 2: Set output format
Pavtube DVDAid offers many optimized video format for different devices. Just click “Format” bar to find “Samsung” profile. Here, you can choose “Samsung Galaxy Tab H.264 (*.mp4)” as the best video format for Samsung Notebook 9.
Tips: 1. you can click “Settings” on the interface to adjust the parameters including size, bitrate, frame rate, etc. to get a high quality of output files or a smaller files size.
Keep in mind the file size and video quality is based more on bitrate than resolution which means bitrate higher results in big file size, and lower visible quality loss, and vice versa. You can preview the size at the below chart.
2. Open "Video Editor" window, switch to and click "Crop" tab, click the icon on the right-bottom to swtich to the advanced mode, then you can choose the output aspect ratio such as 16:10, 16:9, 5:4, 4:3 and 2:1 from the drop-down list of "Display Aspect Ration".
Step 3: Start ripping The 33 DVD to Samsung Notebook 9
Switch back to the main interface, click the big button "Convert" on bottom-right corner to start The 33 DVD to Samsung Notebook 9 conversion process. When the process is over, you can find the converted files by clicking the "Open output folder" on the main interface of the program.
Finally, what you need to do is to transfer The 33 DVD backup to Samsung Notebook 9. Then you can enjoy the movies on Notebook 9 anytime you want.
How to upgrade Lenovo A7000 plus Android Lollipop to Android 6.0 Marsmallow At last after the news that Lenovo a7000 plus will release an update for Android 6.0 or Marsmallow this upcoming month of April. This was already leaked by unknown Chinese Hacker in other Social Community Website and Forum.
This Marsmallow ROM was originally from Lenovo K3 Note which also compatible in Lenovo a7000 plus by using the "modem patch" that are always used in Lenovo K3 Note Rom. Recently, I already published Lenovo K3 Note on how to upgrade to Marsmallow using stock recovery, but this only 50% chances to update successfully. Thankfully, with the help of our Developer Mr. Cuoc092 find ways and things possible to install the Rom using Custom recovery (TWRP) with 99% success rate. According to him this is stable version and haven't found any issue at the moment.
#changelog - Based on stock VIBEUI 3.1 (1604) Marshmallow 6.0 - Debloated (no China apps 😅) - Added Gapps (01/2016) - Patched kernel security - Partially rooted (I'm working on it) - Multilanguage support - Working LED notifications - Cuoco92 Advanced Settings ...and more Note: Im not liable for any damage happened in your device! Do it at your own risk!
How to fix bootloop/hardbrick CherryMobile Omega HD3 [PAC]
Note: * I'm not responsible for any damages will be held! Do at your own risk! * Rooted system on .PAC file * Follow instructions! * This will delete your installed user apps!
For: * Bootloop * Recovery loop * Stuck at logo * Black screen * Hardbrick / Softbrick
Part One: Installing drivers
1. Extract the driver file. 2. Run dpinst.exe . Note that "x86" folder is for 32-bit computer while "amd64" is for 64-bit computer 3. We have to verify if the driver is installed, right-click on My Computer(WinXP)/Computer(Win7)/This PC(Win8) then Manage>Device Manager 4. Turn off your phone and remove the battery then insert back the battery again. 5. We have to first detect the phone to PC if its driver is working. Plug in the micro USB cord to your phone first but don't connect the USB cord to PC itself. 6. Timing is important! Hold volume down then immediately plug in the USB cord to your PC. 7. A poped-up notification appear to show if the drivers are successfully installed. 8. You may now remove the USB cord to the PC if success but don't remove yet the micro USB cord to your phone. 9. Now, we are ready to use Research Download!
Part Two: Using Upgrade Download
1. Extract Resarch Download file 2. Extract your downloaded stock ROM file 3. Run ResearchDownload.exe 4. Click the first gear button. This will open up a browse menu. Use this to locate your .PAC file then click "Open" button. 5. Once the PAC file is loaded click play button . 6.Connect your Omega HD3 (while holding volume down) 7.You should see in research download that it has started flashing! (you can let go of the volume key now). When it is finished just press the stop button and disconnect your phone!
Additional: * After the first boot of your phone, your current internal storage is xxxGB. Before doing anything else like rooting, installing or flashing recoveries, go to Settings>Factory data reset>Factory data reset then tap Reset Phone then tap Erase everything. Your phone will reboot to recovery. Wait for erasing and it reboot automatically. After that, your internal storage restore to its default size
2.) For Win 10 Install Drivers USB_VCOM_Driver.rar
In Device Manager Right click on PC name(Right Side) and then click on Add legacy hardware as shown in image below.
Now in Add Hardware Wizard click on Next » Install the Hardware that i manually select from a list (Advanced) » Show All Devices » Next » Have a Disk, Now select the any inf file from where you extracted the downloaded VCOM driver package.
3. Now Click on Next and select Install this driver software anyway and wait for finishing the process.
4.After installation is finished then Restart your computer, That's it.
5. Open flash_tool.exe, click on the Download Tab Extract the downloaded Stock rom to desktop of your computer.
6. Click Scatter-loading and browse for the scatter file (MT6582_Android_scatter)
7. For Bootloop only Make sure flashing mode is set to "Download Only" and check mark all except Preloader. Note: If deadboot/hardbrick set "Download+Format" and check Preloader.
8. Click Download.
9. Turn off your phone, connect your phone to the PC and wait for the flashing to commence.
10. Green Circle image with check will show once flashing is completed. That's it!
11. Disconnect your phone in USB cord then on your phone! If still bootloop Go to recovery mode
Reboot and press vol up and power On button. Then perform Wipe cache and data or Factory reset!
Note: .After Flashing the ROM, you will be stucked up in MyPhone logo. So follow the steps below.
A. Turn Off the Phone
B. Hold Power + Volume Down
C. Go to Signaling Test, and press Menu button.
D. Wait for a while and you will see selections, choose TEST PASS and REBOOT.
Credits: Benjie Loria MyPhone RIO 2 Lite | Micromax Unite 3 | Wiko Bloom 2 UNITED™ Group http://androidcribs.com